From the Lab
Monday, August 30, 2021
Sample Roasting Profiles: Updated
When roasting experimentally-processed (EP) coffees, it’s important to understand that these beans can behave very differently during the roasting process. When we wrote our last sample roasting article, we were differentiating between 4 basic profiles, which are guidelines for approaching a coffee you’ve never roasted before. Experimentally-processed (EP) coffees are gaining more and more popularity, so we’ve added a 5th profile to keep up with the current trend.
In our last article about sample roasting in spring 2020, Jasper explained the different variables we can adjust during our roasting process. Since that article, Jasper has left for new adventures, but the sample-roasting torch is taken up by Franciska Apro, Quality Control Coordinator for Sucafina Specialty Europe. We are grateful to Jasper for sharing his expertise and laying down the principles of our sample roasting protocol and excited to learn from Franciska, whose experience as a barista, barista academy instructor and quality coordinator make her an ideal torchbearer.
After reading, don't forget to download our roast summary for easy reference.
While everyone has their own methods, we’re sharing our guidelines to help inform your sample roasting practice.
The Profiles: Definitions
Our 5 basic profiles are split up between 2 profiles for microlots, 2 profiles for high commercial coffees and 1 for experimentally-processed coffees (EP for short). We further differentiate between Natural and Fully washed coffees.
With Microlots we mean anything that is traceable to a single producer or farm and have a minimum score of SCA 85. We assume here that the coffee will be uniform and clean. These beans often have a higher density compared to the other group. Because of this, we approach these coffees with slightly faster roasts and shorter development times.
High commercial coffees are still specialty coffee (if we only consider the cup score here), but generally in larger volumes with a bit more variety in bean sizes and density. Here we prefer to roast a little longer with an elongated first crack to avoid uneven roasting and under-roasting. A lot of high commercial coffees can taste very vegetative when not developed properly. This is why we approach them with a roast that is less likely to end up under-roasted.
We differentiate between Natural and Fully washed coffees because we notice that, regardless of density or moisture content, washed coffees can handle more energy in the crack, while naturals have to be treated a little more gently at the end of the roast to prevent roasty, scorched flavors.
These profiles are intended as guidelines, and each roast will depend on the individual coffees you choose. For example, with a Kenya Peaberry, we know this coffee is pretty dense with a smaller screen size. We will use the washed Microlot profile, but we know that the beans might develop a little faster because of the high density and small beans. So, we would start the roast according to the profile, but keep the extra information in mind when reacting during the roast.
Experimentally Processed Lots
Our last group is experimental processed (EP) coffees, which require their own profile. EP is everything that went through primary processing with a significantly different approach compared to the classic Fully washed and Natural process, often with a longer fermentation time. This can include Anaerobic fermentation, carbonic maceration (which is a form of anaerobic fermentation), extended fermentation, slow drying, or the use of different yeasts in the fermentation tanks.
Changes in roasting times are mainly due to the longer fermentation time. As a result, the ideal roast curve and roasting time can be very different compared to a traditionally-processed coffee. These beans usually have a higher sugar concentration, which means that they absorb heat more easily and, if too much heat is applied, can easily burn.
The Profiles: The Nitty Gritty
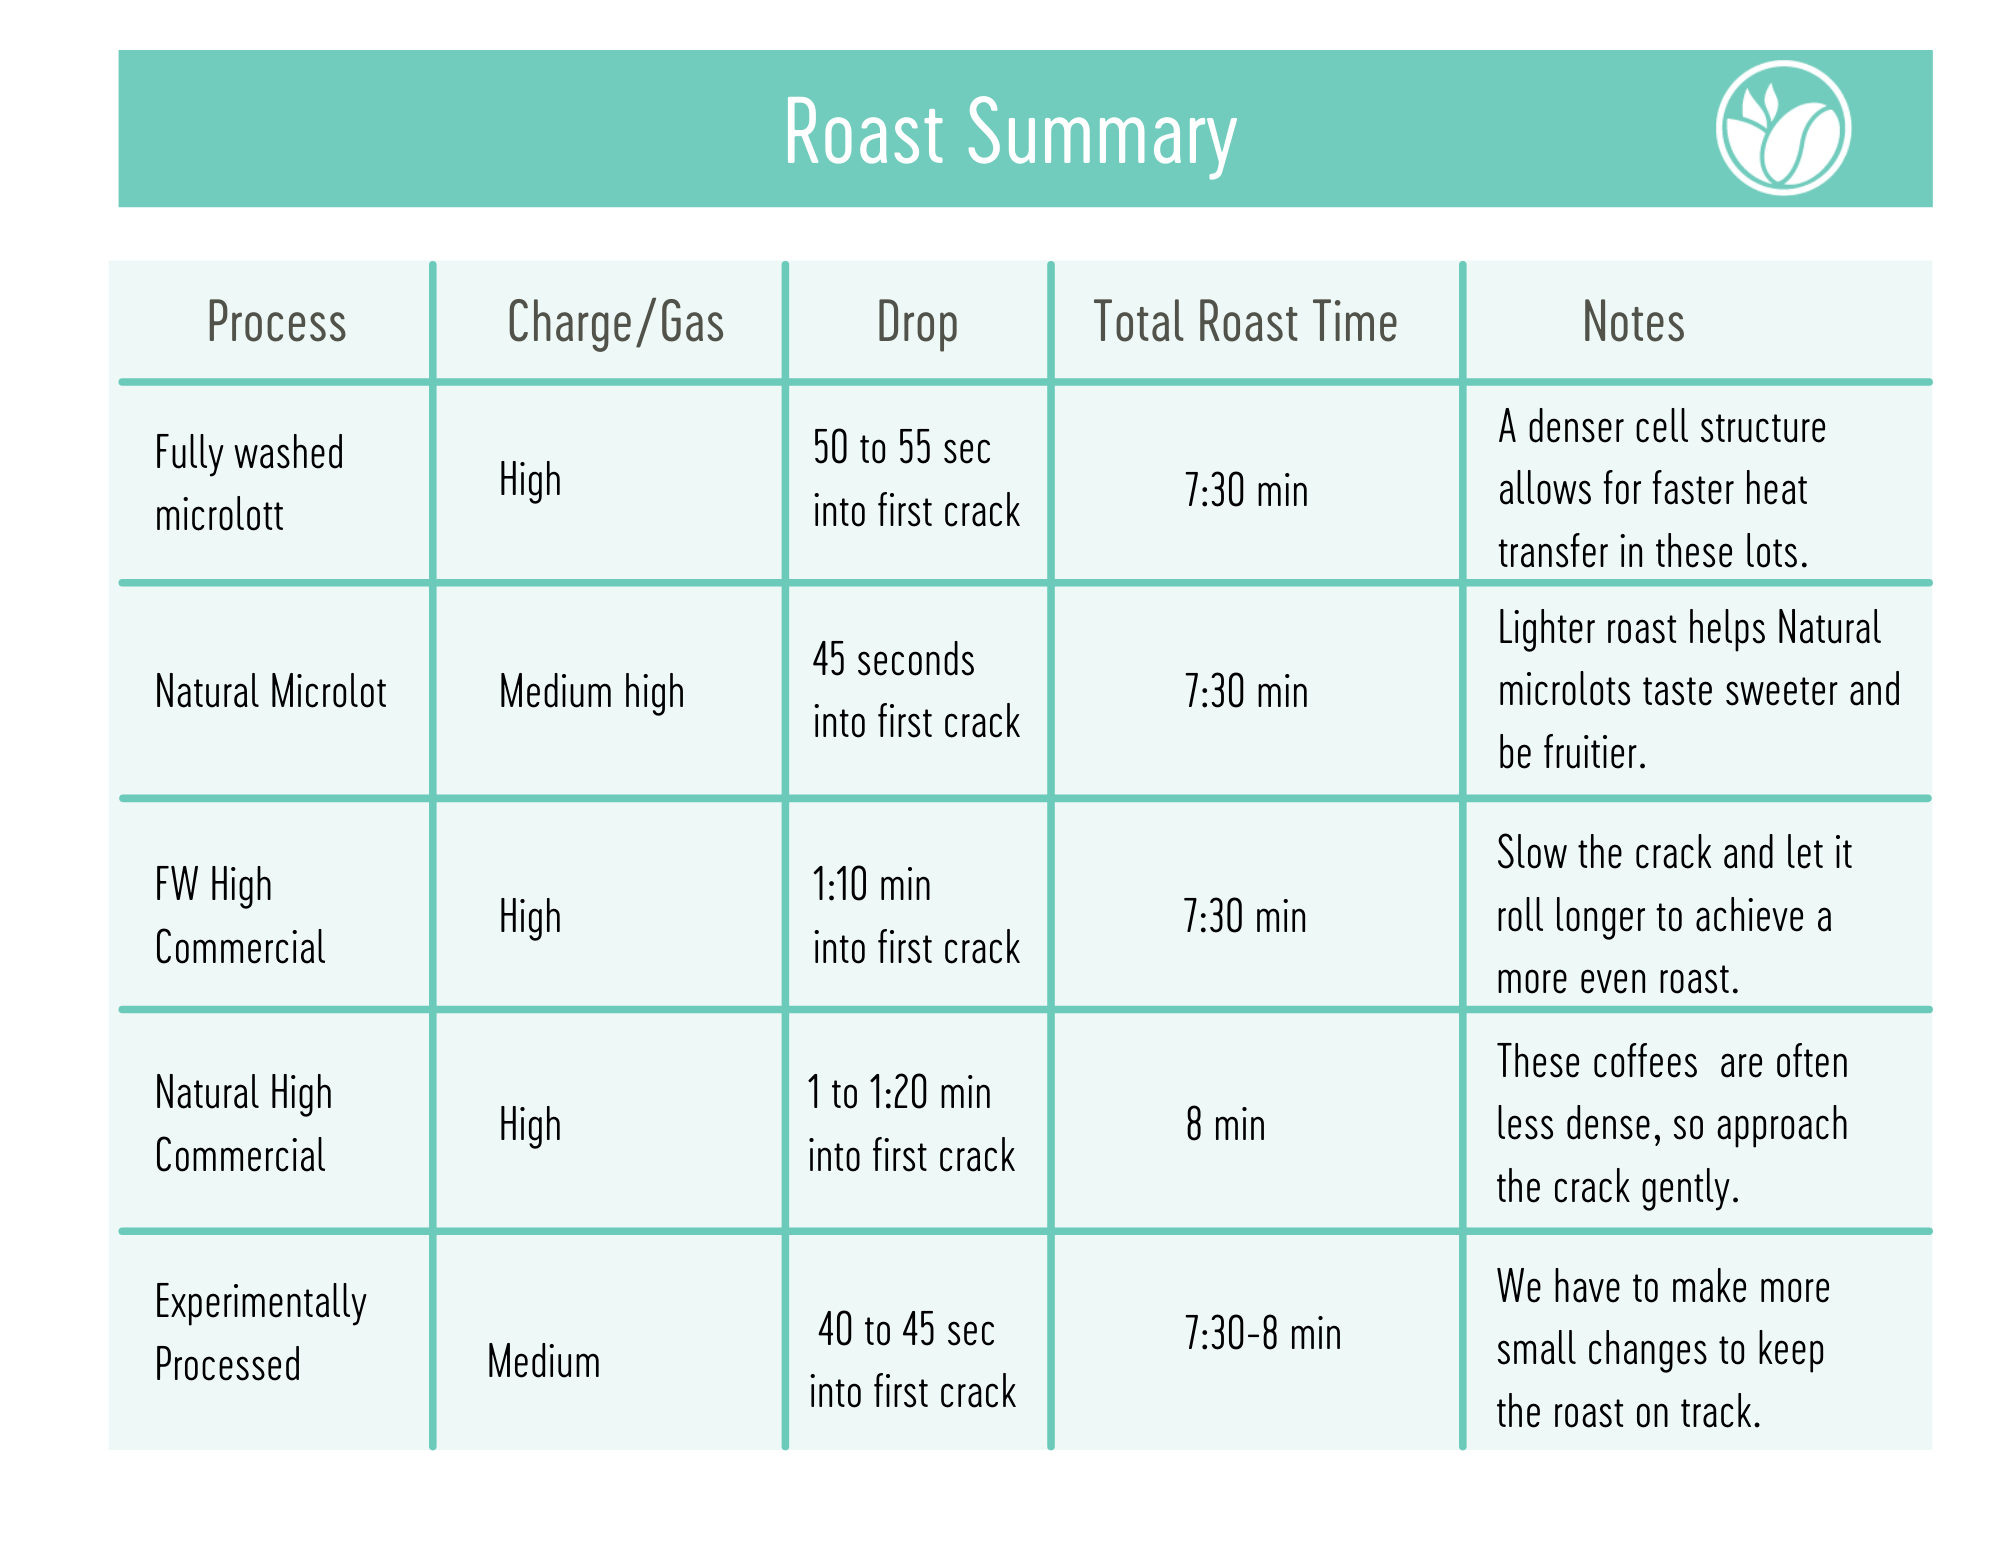
Fully Washed Microlot
We start with a medium charge temperature and a high gas setting. Generally, these coffees are denser so they can roast faster while still fully developing the core of the coffee seed. This is because a denser cell structure allows for a faster transfer of heat from the outside of the bean to the center. These coffees should be clean and uniform, so uneven roasting should not be an issue. We go into the crack with lots of momentum and drop the beans about 50 to 55 secs into first crack.
Total roast time is around 7:30 min.
Natural Microlot
Because we still want a fast roast, we start with a slightly higher charge temperature (medium high) but have a slightly lower gas setting to approach the crack a little slower. This is to avoid the coffee taking off after first crack. We drop the beans about 45 secs after hearing the first pops, a little faster than with washed coffees. We’ve noticed that most natural microlots taste a lot sweeter and show most of their true fruity character with a slightly lighter roast.
Total roast time is around 7:30 min.
Fully Washed High Commercial
When roasting high commercials, we start with a high charge and lower gas. We want the roast to start fast but end with a slower momentum. We do this because we often notice fluctuations in moisture content and density. If we slow down the crack and let it roll a little longer, we achieve a more even roast. This will then ensure that we consistently develop these samples properly to avoid the unpleasant flavours of underdeveloped coffee. Because we are entering first crack with slightly lower momentum, we drop the coffee around 1.10 min into the crack.
Total roast time is around 7.30 min
Natural High Commercial
Very similar to the washed profiles but with lower gas and higher charge temperature. These coffees are usually not very dense, so we have to be very gentle approaching the crack. Depending on how fast the beans are going after starting first crack, we drop them 1 to 1.20 min into the crack.
Total roast time is also around 8 min
Experimental Processed Coffees
As described in our previous article, we aim to keep our profiles simple and repeatable. However, we’ve found that this approach doesn’t work very well in the case of these unconventional coffees. We have to make more small changes than usual to keep the roast on track and achieve end results that are similar in roast level to our regular profiles.
We usually start with a lower charge temperature with a medium gas setting, but as soon as color change occurs we start to gradually open airflow to lower the temperature in the drum and, if that doesn’t slow down the roast enough, we slightly lower the gas as well. The curve itself will look similar to our microlot natural profile, except that the Maillard phase is a bit longer here (first crack occurs later) and that we hit first crack with less momentum in the roast. We open airflow to 100% when beans are starting to crack and depending on the intensity of the crack (we don’t want the beans to crack hard, as these beans are very prone to tipping and scorching) we lower gas to 0 about 20 seconds into the development time.
Total roast time is between 7:30 to 8 minutes with a development time of around 40-45 secs.
Our Roasting Practice
To help you adjust our sample roast profiles to your set up, here is more information about what our set up looks like. In our lab in Antwerp we roast on a Probat BRZ with electrical heating elements (to use consistent terminology we still use the word ‘gas’ in the text to talk about the amount of heat applied)
This machine has an open front, so cold air is always sucked in when we adjust the airflow. So more airflow means more cold air which makes the temperature rise less quickly. This is important to know to understand the way that we roast and react during the roasting.
Basics
Our basic sample roast goes something like this:
- Charge the beans at a temperature between 90-105°C (specific to our machine)
- We charge the beans on the decline of temperature after the previous roast has finished. Gas off, airflow completely open, this usually takes around 1.30 to 2 minutes.
- Charge with the gas between 7-8 (this is also specific to our machine)
- We decide the start gas setting based on the profile that we are using
- Charge with the airflow at the halfway mark
- If everything goes right, let the sample roast on these settings until it hits first crack
- Mark first crack when you hear more than one crack or when you can see the beans visibly move.
- First crack should happen between 6.00 and 7 min
- Open the airflow to 100% at first crack
- Lower the gas just slightly after first crack
- Drop the beans after 40sec-1.10min (just at the end of first crack)
Reacting during roasting
Of course not all the roasts will go as planned without intervention, so here are a few means that we use to keep everything in check.
- Visually assess the status of the sample during roasting to see if a reaction is needed
- Color should turn to yellow between 3.30min-4:30 min
- Beans should start cracking between 6.00min and 7 min
- Color should develop evenly
- After first crack beans should not turn too dark too fast
- If a roast is going too fast/slow before first crack, we react by changing the airflow
- Open or close the airflow just a little to slow down or speed up the roast
- We generally don’t change the gas in this case, unless it is a frequently occurring problem (except for EP coffees)
- When the coffee starts to crack, we only fully open the airflow to 100% when the beans reach a rolling crack
- If the beans start cracking very soft or very slow, we only gradually open the airflow to not slow the momentum of the roast even more. If we were to introduce too much air foo fast, we risk baking the roast and muting the flavors. When this happens, this means the gas setting is too low for this coffee, in future roasts we increase it by 0,25 and drop the charge temp with 5°C to make the roast crack harder but still finish within the same time-frame
- If the beans start cracking very hard and fast, we open the airflow straight away and lower the gas by minimum 1 point. Here we also drop the beans before they turn too dark. When this happens, this means the gas setting at crack is too high for this coffee, in the future we drop the gas setting by 0,25 and raise the charge temp with 5°C
Cupping
We don’t want to get too deep into our cupping protocol here, but what is very important to note is that we always cup the coffees the day after roasting. Not because this is necessarily the best practice but because this is the most consistent way of evaluating our samples. If we were to cup the samples at different times after roasting, we include another variable; resting. Resting can definitely improve the quality of roasted coffee in some cases, but it is a variable to avoid when trying to objectively evaluate the quality of a given sample. We roast in the afternoon, cup in the morning and we try to never change this routine.
So, ulitimately it doesn’t matter if you cup your samples 1, 2, 3 or more days after roasting, as long as you let the coffee rest the same time every time. Consistency is key.
Download our roast summary for easy reference.
About the Authors
Franciska Apro – Quality Control Coordinator at Sucafina Specialty EMEA and a licensed Q Arabica Grader. She previously worked as quality control manager and production roaster for a Hungarian roastery. She holds a bachelor degree in international relations, but, ever since she set foot in a specialty café, has always imagined herself in the coffee industry. In her free time she enjoys hiking, doing yoga and baking sourdough goods.
Jasper De Clerck — previously Head Roaster at The Barn and currently Founder and Roaster at Tāne Roasters Collective.